Purple Poodle Postcard

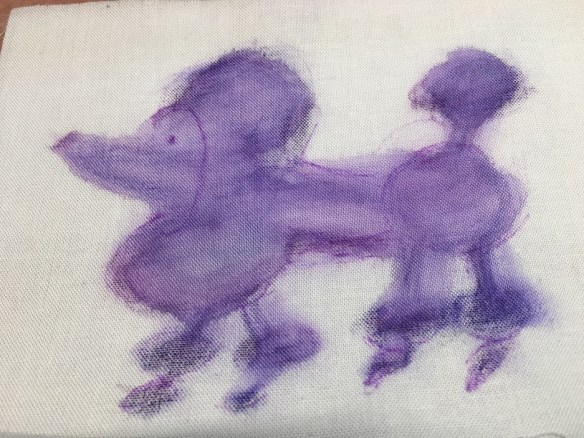
Lately I’ve been in the mood to create fabric postcards. I forgot to photograph the first one I recently mailed. Here’s is the second: a purple poodle postcard I mailed to Judy.

Here I’ve painted the muslin with fabric paints.

00s Purple Poodle to Judy King (1)

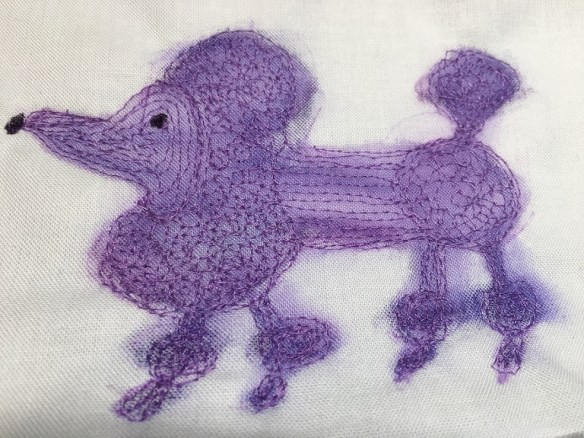
Now it is stitched out.

00s Purple Poodle to Judy King (2)

~~~~~~~~~~~~~~~~~~~~~~~~~~~~~~~~~~~~~~~~~~~~~~~~~~~~~~~~~~~
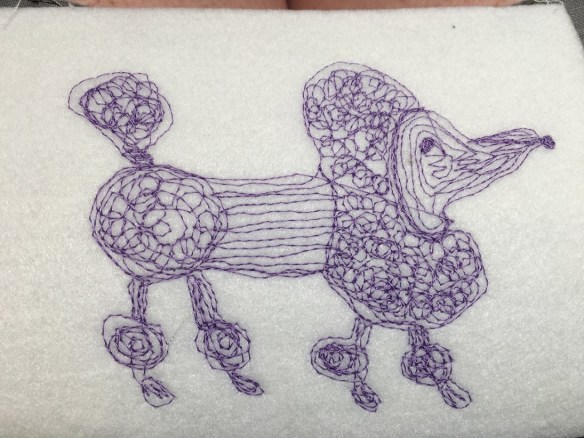
This last photo is the reverse side. I cover this up with an index card used for the mailing address and my message. The muslin and Peltex start out as 4.5 x 6.5 inches. After I finish sewing, I cut them down to 4 x 6 inches to match the index card. I zig-zag around the edges, securing some cording and the index card.

00s Purple Poodle to Judy King (3)

I attach a First Class postage stamp to it (it’s thicker than the one-layer postcards so it needs more postage), take it to the USPS, stand in line, and have them hand-cancel it. I put it in a clear plastic mailing envelope (not required, but it keeps the postcard from getting anything on it in transit), hand it over, and they mail it.

Fabric Doors

I love taking art quilt classes. In my latest class, Fabulous Facades by Gloria Loughman, we started out with the same pattern to learn her appliqué technique. We pinned our doors on the design wall. I like them all.

Later we used her technique to work on our own photos/patterns. I am using a photo/pattern of a fishing cabin. It should be finished about this time next year, but don’t hold your breath. Once I get home from class, I get into my routines and ruts and unfinished projects tend to disappear into the landscape of my sewing room.

This fabric door is mine. It’s approximately 12 x 16 inches.
Tresha's Door

These are all the students’ doors and the instructor’s sample (bottom row, second from left).
All class doors

Montgomery Ward Sewing Machine

Look what I found in the guest room where I stayed with friends: a Montgomery Ward sewing machine. This was one of those instances where I made myself at home: I spent at least 30 minutes moving this sewing machine all over the room trying to get a good photograph. (It wasn’t set up to be used. It was being stored in the extra bedroom.)

I have no idea as to the year it was made. Montgomery Ward sewing machine (23)

I even took some art work from the dining room and turned it around to use as the backdrop because I discovered that the sewing machine and the wall were the same color. (The framed art work was just leaning up against the wall; it wasn’t hung up.)

I don’t know what this knob does.

Montgomery Ward sewing machine (18)

Moody, Texas

And, yes, I put everything back in its proper place after finishing the photograph session.

~~~~~~~~~~~~~~~~~~~~~~~~~~~~~~~~~~~~~~~~~~~~~~~~~~~~~~~~~
After the original post, I asked Kay if the machine works. She said it works and she uses it all the time.

Circular Embroidery Attachment

In the last sewing class I took, I learned how to use the circular embroidery attachment. I had owned the attachment for years without using it (eek!), but I had it when I needed it for class!
~~~~~~~~~~~~~~~~~~~~~~~~~~~~~~~~~~~~~~~~~~~~~~~~~~~~~
After the practice piece, this is the first class sample I made. As far as I can tell, the circular embroidery attachment is magic. I can’t really see how it works as it is covered up by the fabric, but somehow it makes the fabric move in a circle. You have to be careful not to tug on the fabric as the machine is sewing or the ends of the stitch circle won’t match up. Ask me how I know.

Class Sample 1

~~~~~~~~~~~~~~~~~~~~~~~~~~~~~~~~~~~~~~~~~~~~~~~~~~~~~
This is the second sample I sewed in class.
Class Sample 2

~~~~~~~~~~~~~~~~~~~~~~~~~~~~~~~~~~~~~~~~~~~~~~~~~~~~~
When I got home and unpacked all my sewing gear, I set up my machine and practiced a bit more just like I’m supposed to do, to help internalize what I learned in class. I’m pretty happy with the results. I’m not sure what I will do with these samples but now I know how to use the attachment.

Circles on my own