Three-Hour Apple

After struggling with my first oil painting, I realized that I don’t know enough about tone. I returned to using charcoal and sketched an apple. I spent three hours on this apple. I think it’s recognizable as an apple, but not necessarily the apple I used as my subject. Sigh.

A charcoal sketch of an apple

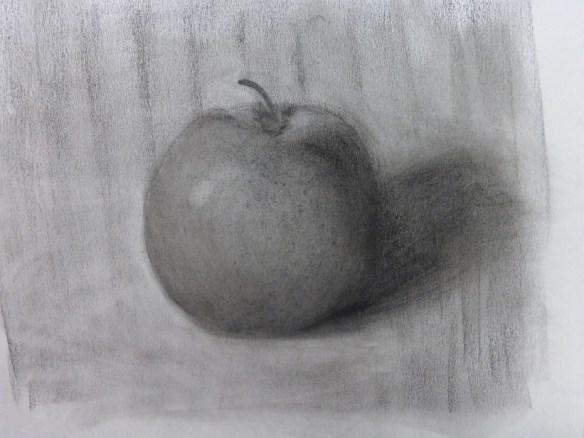
Yes, that’s an apple

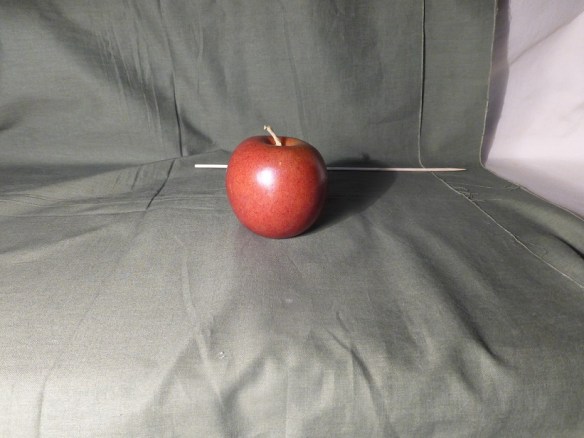
The bamboo skewer is there to point out to me where the top of the shadow is relative to the top of the apple. (From where I sat when I sketched the apple, the shadow was lower than how it looks in the photo.) When I first sketched the apple, the shadow was much higher. Why? I don’t know.

An apple, with a bamboo skewer behind it marking the top of its shadow

Seems straightforward enough

My first problem was that I shaded my background way too dark (I laid down a 6 tone and it should have been a 4) and then had trouble distinguishing the dark tones of the apple and its shadow (tones 6-10). The instructor put a 6-tone fabric under the apple to help me see the difference in a 4 tone and a 6 tone. You can barely see the lighter fabric in the top right corner of the photo.

The tone chart goes from light to dark. I know that 1 is white and 10 is black. I might even be able to put down on paper a correct likeness of 2 (one tone darker than white) and 9 (one tone lighter than black). But talk to me of a 4, 5 or 6 and I will not be able to mass it in correctly.

What did I do in that three hours? I sketched in the apple, put in tones . . . and then erased them. I did this several times trying to get the shape and tones of the apple correct, as well as the shape and the tones of the shadow. I’m getting really good at erasing.

I’m choosing to work on tones in charcoal a while before my next oil painting effort. We’ll see how long that takes.

A Finished Unfinished Oil Painting

I started the beginning-level oil painting sessions the last week of May. I chose three objects for my set-up: an apple, a bowl, and a pitcher. First I sketched the objects with charcoal (on canvas), next I massed them in with Raw Umber oil paint, and finally I began painting, using only two colors: Raw Umber and White.

Here it is near the end of September and I’m still working on this same painting.

A photo of the still life objects that I chose to paint: a red apple, a yellow bowl and a white ceramic pitcher with handle

Still life

As an art student with no art experience or skill, I have trouble seeing some of the details. What I saw was a red apple, a white pitcher and a yellow bowl. What my instructor saw was an dark apple that projected a two-tone (at least) shadow, a bowl with a lip and a small pedestal, and a pitcher with a handle that changed width due to its angle. All these objects had highlights and tones (up and down, side-to-side) that indicated they had contours.

Really? Oh.

Step 1 in the beginning painting process: sketch the objects with charcoal on a canvas

Step 1: Charcoal sketch

That bowl and apple gave me fits. My version of the apple turned into a dark glob; same tone as its shadow. Sigh.

Objects massed in with raw umber as the base color oil paint

Step 2: Raw umber as the base color

The bowl changed shapes so many times, I lost count. I elongated its width too much and one side was drooping way lower than the other. It was too close to the apple, then I moved it too far away from the apple. Sigh.

A photo of the in-progress oil painting.  The objects are recognizable but do not reflect the actual shading

Step 3: Progress, mostly

The only reason the apple is recognizable now is because my instructor sat down last week and spent about 30 minutes correcting all three objects, explaining each stroke she painted. Deep sigh.

Photograph of the painting that I'm calling finished even if it's not

Step 4: Declaring it finished

And that handle on the pitcher? My next painting won’t have one of those, I can tell you that.

I’m declaring this painting finished and moving on. At this rate, I might have another one “finished” by Valentine’s Day. I’m just not saying which year.

Art Quilts

The Austin Area Quilt Guild hosted their 2014 quilt show this month. I always come away inspired by the wonderful quilts that people make. One nice thing is that I know some of these people. And while I’m off taking blurry, over-exposed photographs of butterflies and spiders, they create beautiful works of art.
~~~~~~~~~~~~~~~~~~~~~~~~~~~~~~~~~~~~~~~~~~~~~~~~~~~~~~~~~~~~~~~~~~~~~~~~~~~~
Pat Creswell won First Place in the Art Quilt division with this quilt, Red Tag. She created it in memory of the trees that we are losing due to the drought. The red tag is put on trees that have died and need to be cut down.

An art quilt showing trees that are marked for cutting down, due to the drought

Red Tag by Pat Creswell

A close up of the Red Tag quilt, showing the fabrics and quilting

Beautiful artistry, fabric, quilting

~~~~~~~~~~~~~~~~~~~~~~~~~~~~~~~~~~~~~~~~~~~~~~~~~~~~~~~~~~~~~~~~~~~~~~~~~~~~~
Dee Merrill created Blue Women.

An art quilt created by Dee Merrill of four women in blue robes walking in the desert.

Blue Women by Dee Merrill

.

A close up of the art quilt Blue Women by Dee Merrill, showing the blue robes against the desert sand

Lovely contrasting colors

~~~~~~~~~~~~~~~~~~~~~~~~~~~~~~~~~~~~~~~~~~~~~~~~~~~~~~~~~~~~~~~~~~~~~~~~~~~~~
This beautiful quilt, Georgia, was created by Mary Ann Vaca-Lambert. Georgia was an abandoned cat that Mary Ann and her husband took in.

An art quilt of a cat, quilt created by Mary Ann Vaca-Lambert

Georgia by Mary Ann Vaca-Lambert

Close up of the art quilt of a cat, Georgia

Georgia close up.

One Down, A Gazillion To Go

I finally pulled out one project from my UFO (unfinished object) stash and completed it. It’s the pink fabric bowl. There it was, under my sewing table, already wrapped and pinned, sitting for over a year. (Ahem.) All it needed was for me to sew it. How hard can it be?

Two fabric bowls: one pink and one blue with orange trim

Ready for duty

Not very hard and it didn’t take very long. And I just adore it. Now it sits by my computer and all my charging cords go into it. The pink bowl was an experiment: I wanted to see what size of bowl one fat quarter would make. I cut the pink batik fat quarter into 5/8-inch strips. I wrapped the cotton cord, gluing and pinning at the end of each strip. (You’ll see what happens when I didn’t pin in the middle for the blue and orange bowl.) And voilà, a lovely fabric bowl.

Looking down, inside the fabric bowls

Inside

I was inspired. But instead of choosing another UFO, I decided to experiment again and make another fabric bowl. What would it look like, I wondered, if I serged the fabric edge with a rolled hem in a contrasting color? For the my second experiment, I used a dark blue tone-on-tone batik fabric and orange embroidery thread.

The blue and orange bowl started out as half a yard, cut into 1 3/4-inch strips (I think). I sewed the strips together end-to-end, making one long strip; this measured just over 11 1/2 yards. Then I ironed the strip in half length-wise and serged the raw edges. (This took quite a while.) The result was one long strip with one folded edge and one edge with a rolled hem.

Pink bowl with bananas in it to show size

Not to big, not too small

I wrapped the blue and orange fabric over the cotton cord. Actually, I had to wrap it twice. The first time I wrapped it, I hadn’t pinned the blue and orange strip anywhere other than the beginning and end because it was just one long strip. (There was no need to sew the pink bowl fabric strips together end-to-end, so they were wrapped around the cord separately with each end overlapping the next, glued and pinned in place.) The wrapping loosened up in several places while it was in queue and I couldn’t get the edges to tuck in. Rats! I had to completely unwrap it, uncoil the fabric and the cording and then wrap it again, with lots of pins this time.

What are fabric bowls good for, other than charging cords? I like them for keys, watches and bracelets; the fabric bowls are soft don’t scratch (or get scratched by) these items. They are good for lots of sewing tools and trinkets. Mostly they are fun to make.

So, that’s one UFO taken care of, about a gazillion more to go.